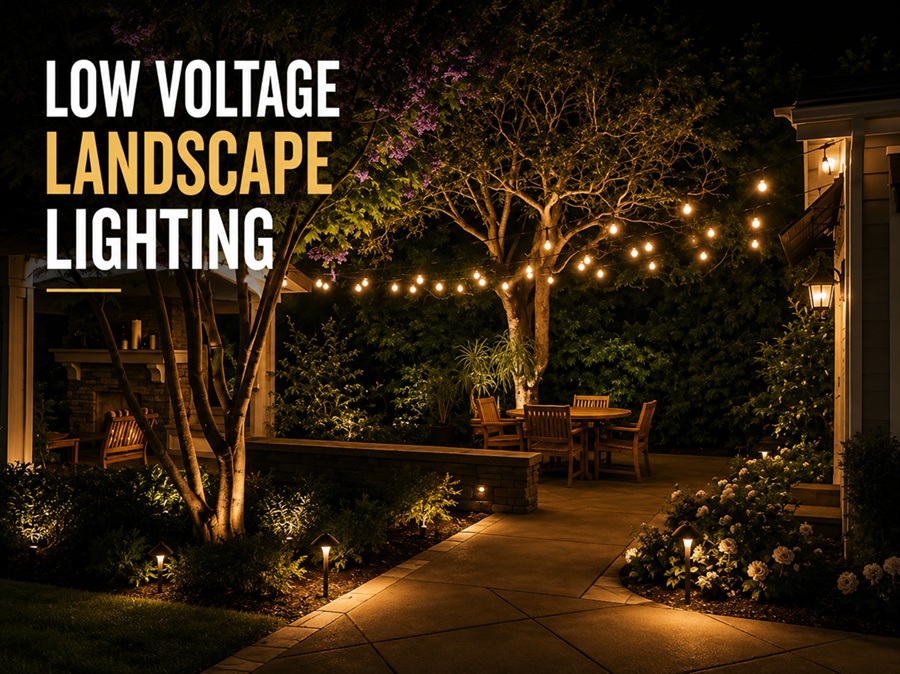
Low voltage landscape lighting is an outdoor lighting system that runs on 12 volts instead of standard household power. A transformer steps your home’s 120-volt supply down to a safe 12 volts, which then travels through buried cable to path lights, spotlights, and other fixtures around your yard. Because the voltage is so low, the system is far safer and much more DIY-friendly than line-voltage lighting, which is exactly why it has become the standard for illuminating gardens, paths, and home exteriors.
If you have admired the way some homes glow at night, with softly lit walkways and trees washed in light, that is almost always a low voltage system at work. It combines safety, energy efficiency, and design flexibility in a package a confident homeowner can install over a weekend. This guide explains how the system works, the fixtures and techniques involved, how to plan and size it, and what installation entails.
| What it is | A 12-volt outdoor lighting system |
| Core component | A transformer that steps 120V down to 12V |
| Why low voltage | Safer and easier to install than line voltage |
| Common fixtures | Path, spot, well, flood, and deck lights |
| Bulb type | LED, for efficiency and long life |
| DIY friendly | Yes, for a confident homeowner |
| Main uses | Paths, uplighting trees, accenting features |
| Key planning step | Sizing the transformer to total wattage |
How the System Works
A low voltage system has three core parts. The transformer plugs into a standard outdoor outlet and reduces the voltage to a safe level. From there, a low voltage cable runs from the transformer around your yard, often buried a few inches deep. The fixtures then connect to that cable, drawing the 12-volt power to light your paths, plants, and features.
Because the current is low voltage, a minor wiring mistake is far less hazardous than with full household power, and many systems use simple connectors rather than complex electrical work. A timer or photocell is usually added so the lights switch on at dusk and off automatically, so you never think about them once they are set up.
Common Fixture Types
Different fixtures do different jobs, and a good design mixes several. Knowing what each one is for makes planning far easier.
| Fixture | What It Does | Typical Use |
| Path light | Casts light downward | Walkways and garden edges |
| Spotlight | Narrow, focused beam | Uplighting trees and features |
| Well light | Ground-flush uplight | Discreet uplighting |
| Flood light | Wide, broad wash | Lighting facades and large areas |
| Deck / step light | Localized safety light | Stairs, decks, and railings |
Design Techniques That Look Professional
Great landscape lighting is about technique as much as fixtures. A handful of classic methods, used together, create depth and drama instead of a flat, over-lit yard.
| Technique | How It Works | Effect |
| Uplighting | Light aimed upward at an object | Dramatic emphasis on trees, walls |
| Downlighting | Light aimed down from above | Natural, moonlit feel |
| Silhouetting | Light behind an object | Bold outline against a wall |
| Path lighting | Low lights along a route | Safe, welcoming walkways |
| Washing | Even light across a surface | Soft glow on facades and hedges |
Planning Your Layout
A little planning prevents most headaches. Walk your yard at night with a flashlight to test where light looks best, and sketch the positions of every fixture before you buy. Think about what you want to highlight, a specimen tree, the front facade, a winding path, and resist the temptation to light everything, since restraint reads as more elegant than a floodlit yard.
- Identify the key features worth highlighting and skip the rest
- Aim for pools of light and shadow rather than uniform brightness
- Keep fixtures hidden where possible so you see the light, not the source
- Plan the cable route from the transformer to each fixture
- Position the transformer near an outdoor outlet
Sizing the Transformer
The transformer is the heart of the system, and sizing it correctly is the most important technical step. Add up the wattage of all your fixtures, then choose a transformer with capacity comfortably above that total, leaving headroom so you can add lights later. Undersizing leads to dim, underpowered fixtures, especially at the far end of long cable runs, so err on the generous side. LED fixtures make this easy because they draw so little power that even large layouts stay well within a modest transformer’s range.
LED vs Halogen
Older low voltage systems used halogen bulbs, but LED has become the clear choice. LEDs use a fraction of the energy, last far longer, and run cool, which reduces maintenance and lets a single transformer power many more fixtures. Halogen still produces a warm light some people like, but its higher energy use, shorter lifespan, and heat make it hard to justify today. For a new install, LED is almost always the smarter investment.
Installation Overview
Installation is well within reach for a handy homeowner. After planning, you mount the transformer near an outdoor outlet, lay the low voltage cable along your planned route, and connect each fixture to the cable, often with simple push or clamp connectors. You then bury the cable a few inches deep, position and aim the fixtures, and set the timer or photocell. Testing everything at night before you bury the cable fully lets you fine-tune aiming and spacing while adjustments are still easy.
Maintenance
Low voltage systems are low-fuss but not no-fuss. A little seasonal attention keeps them looking sharp for years.
- Wipe lenses clean so dirt and grime do not dim the output
- Trim back plants that grow in front of fixtures over the season
- Re-aim any lights knocked out of position by weather or mowing
- Check connections occasionally for corrosion or looseness
- Replace the rare failed LED and confirm the timer is still accurate
What It Costs
Cost depends on the number of fixtures and their quality. A modest DIY starter setup lighting a path and a few features is affordable, while a larger design with premium brass or copper fixtures and a big transformer costs considerably more. Hiring a professional to design and install adds labour but can be worth it for large or complex properties. The ongoing cost is minimal thanks to LED efficiency, so the main spend is upfront.
Frequently Asked Questions
Is low voltage landscape lighting safe to install myself?
Yes, that is a major reason it is so popular. Because the system runs on a safe 12 volts stepped down by the transformer, a confident homeowner can install it without the hazards of full household wiring, though the transformer still plugs into a standard outlet.
How do I size the transformer?
Add up the wattage of all your fixtures and pick a transformer with capacity comfortably above that total. Leaving headroom lets you add lights later and keeps fixtures at the end of long runs from dimming.
Are LED landscape lights worth it?
Very much so. LEDs use far less energy, last much longer, and run cool, letting one transformer power more fixtures with less maintenance. They are the standard choice for new low voltage installations.
How deep should I bury the cable?
Low voltage cable is typically buried just a few inches below the surface, enough to hide it and protect it from mowing and foot traffic. Always follow the manufacturer’s guidance and check for buried utilities before digging.
Choosing Fixtures That Last
Outdoor fixtures live a hard life, exposed to rain, sun, frost, and sprinklers year-round, so material quality makes a real difference to how long your system looks good. The cheapest plastic fixtures can crack, fade, and fail within a season or two, which turns a weekend project into a recurring chore of replacements.
Solid metal fixtures, particularly brass and copper, are the gold standard because they resist corrosion and actually improve with age, developing a natural patina that many homeowners prize. Aluminium and quality composites offer a solid middle ground at a lower price. Whatever the material, check the rating for outdoor and wet locations and look for sealed, gasketed housings that keep moisture away from the connections.
The connections themselves deserve attention too, since a weak link is where most systems fail. Waterproof connectors that fully seal the wire splice prevent the corrosion that dims or kills fixtures over time. Spending a little more on well-made fixtures and connectors upfront usually costs less than repeatedly replacing bargain parts, and it keeps your yard looking polished for many years rather than a single summer.
Final Thoughts
Low voltage landscape lighting is one of the most rewarding outdoor projects a homeowner can take on, transforming a dark yard into something that glows with warmth and depth after sunset. Because it runs on a safe 12 volts, it is genuinely DIY-friendly, and with LED fixtures it costs little to run. Plan your layout with restraint, size the transformer generously, lean on classic techniques like uplighting and path lighting, and you will end up with an exterior that looks polished and professional every night of the year.